(Updates on August 22, 2021: Thanks to the great help of Charles WEI (charles@hkbu.edu.hk), Gary GU (taize_gu@hkbu.edu.hk), and Ching-yin WAN (cywan123@hkbu.edu.hk), I mainly add the supplements for Windows users. They are also my TAs for the course, so please contact them when you find any problem about the setups for Python and R. Windows users can also refer to Jupyter_Win for more detailed instructions, while this post is still the starting material.)
(This post is dedicated to part of the bridging courses for the oriented students pursuing data science related master degrees in the Economics department of Hong Kong Baptist University. Interested audience can also refer to this post as the very beginning for the journey to the data science. Let’s get started!)
Hello, everyone! Thanks so much for your application for the data science related master in the Economics department of Hong Kong Baptist University. First of all, your enthusiasm and interest on data science are highly appreciated, since this is one of the most exciting areas to create great welfare for the human beings. In most of the applications of data science, programming is the usual way (probably the only way) to implement various algorithms and models on distinct types of data, structured or unstructured, textual or numeric. Among multiple popular programming languages, Python and R are undoubtedly the most common choices.
This post mainly introduces the basic setups of Python and R in the viewpoint of the environments. Following this post, a series of notes about the foundations of Python and R for data science are discussed. At the end of the bridging courses, you are expected to construct the appropriate computing environments for the targeting projects and tasks. Furthermore, you are also expected to have basic concepts on data wrangling using related packages within Python and R. During the courses in the coming year, you are going to experience the applications of Python and R for the main topics on Econometrics, Statistics, and Machine learning. Before the detailed discussion on the environments, several points about Python and R are also illustrated here.
Well, we have long long stories to tell about the issue of similarities and differences between Python and R, and interested audience can refer to R wiki and Python wiki. However, here I only give some high-level ideas. Generally speaking, Python and R are both interpreted high-level programming languages, relative to another bunch of compiled low-level languages, such as c, cpp, and Fortran. For the compiled low-level languages, the codes are usually compiled and linked to generate the executable programs before running, while interpreted high-level programming languages are usually comprehended and executed line by line with corresponding R or Python interpreter. Generally speaking, R or Python are much easier to code and debug than cpp or Fortran, but compiled low-level languages highly dominate interpreted high-level programming languages in terms of execution time. So, why not directly learn cpp or Fortran? Please keep in mind that
Note: total time = development time + execution time, and human time is much more valuable than the CPU time.
For daily works, we usually stick to interpreted high-level programming languages in the main source file, and then put the computational intensive parts to compiled low-level languages. In most of the time, we do not even touch the actual codes of cpp or Fortran, because they are wrapped as the Python or R packages and provide the interfaces for Python or R to call. For example, XGBoost is the state-of-the-art machine learning algorithm for supervised learning, and its most computational expensive implemmentation is written in cpp. However, It also provides the interfaces (packages) for other languages, especially Python and R. Of coz, as a data scientist one usually needs to write the customized codes to adapt to the tasks, so he or she can balance the trade-offs and select which type of languages to go. In most of the time, such two-language and three-language problems often annoy the data scientists to code and debug, so nowadays ambitious developers try to develop smarter languages to make our lives easier. Interested audience can refer to Julia, which is “easy to write code that’s nearly as fast as C”
Even Python and R are both interpreted high-level programming languages, but they indeed differ in many aspects of syntax. The detailed discussion will be left for your own practice. However, some historical issues related to their philosophy can be shared here. Python is the general-purposed language, such that it is NOT designed for the specific direction for usage. However, developers from different areas join and contribute the communities, and with the help the the excellent packages Python is vastly applied in machine learning. On the other hand, R is designed for statistics and computation originally and currently it is extended to broader areas on machine learning. One simple example can illustrate this point. Suppose we generate a vector \([1, 2, 3]\) and then multiply each of its element by 3. In R interpreter, we can input
c(1, 2, 3) * 3
then this piece of codes returns
[1] 3 6 9
However, in Python interpreter if we input
[1, 2, 3] * 3
you will find that this returns
Out[1]: [1, 2, 3, 1, 2, 3, 1, 2, 3]
Strange, right? Yes, if we view this issue in terms of the element-wise vector calculation. However, as we know that R is dedicated to statistics and computation but Python is NOT, so it is easy to comprehend their different results. In Python, list is the container to store the objects but NOT ready for computation as numeric vector. If we wanna replicate the same behavior as R, we can import the numpy package for help.
import numpy as np
np.array([1, 2, 3]) * 3
then you will find the output:
Out[2]: array([3, 6, 9])
Actually, np.array() function just generates the one-dimensional array (numeric vector) from the given list of \([1, 2, 3]\), which can be applied for the methods of numerical computation. With more and more examples, you will find that the base R has involved build-in functions for statistics, computation, and data wrangling, while Python usually needs the additional packages to conduct the corresponding tasks. However, such issue cannot tell which is the winner but just the different philosophies. Nowadays, more and more data scientists are both the Python users and R users at the same time, and one can also find that the popular algorithms usually have both Python and R packages for use. If one still wanna check their pros and cons in data science, then I indeed can share my own experience. In terms of data wrangling, Python package pandas is more powerful than base R, but R package tidyverse is as powerful as pandas and convenient to program (e.g. less lines of codes). In terms of the model training pipelines for machine learning, R package tidymodels can highly reflect the thoughts of statictical learning (e.g. general workflows instead of narrow concept of models) and also inherit the convenient coding from tidyverse, but it is under development. However, Python package scikit-learn is relatively mature and powerful, but the application of this package requires careful organization of the training steps and is also more complex to code. In terms of deep learning, Python seems to be the winner mainly because the well-developed communities of Tensorflow and PyTorch. In terms of statistics and econometrics, R packages and Python packages nowadays can usually provide the similar functions, while R usually provides simpler syntax. Before diving into the happiness of the functions of brilliant Python and R packages, please also keep in mind that
Notes: Concept is the base, and programming is the tool
Once the concept is clear for the algorithms, one can code it in any language. Therefore, the first suggestion is that please ask yourself what you are going to do before googling the key words. Another suggestion is that just learn both Python and R and they worth learning. What’s more,
Warning: They are widely required by the coming year’s courses.
One more question may interest most of you: Which is required when finding jobs, Python or R? One can check the job posts in LinkedIn and Indeed when searching for the key words, like data scientist or data analyst. In general, most of the jobs indicate the requirement of the experience of either of them. Furthermore, Python is more common than R, so the rich and abundant experience of Python seems to be the great bonus for finding jobs in data related positions. On the other hand, one can find that SQL is also another common required experience in most of job posts. One can check the the referece for such domain-specific programming language to manage data held in a relational database management system (RDBMS). Roughly speaking, SQL is the standard programming language to process the data in the database and is still frequently used in most of the companies, even though nowadays pandas in Python and tidyverse in R are impressively powerful. In general, if one can comprehend the logic of data processing and have experience of either pandas or tidyverse, it should be quite easy to comprehend the syntax of SQL. In practice, one can also find different variants of SQL which can be used in your future company, such as PostgreSQL, HiveSQL, and MySQL. Admittedly, they indeed have subtle differences in terms of syntax, but they follow similar patterns and at least we can google it. Don’t be worried about the messy syntax of programming, and please believe in
Notes: Practice makes perfect!
Projects and Environments
Starting from this section, we are going to talk about the setups of environments for data science. Generally speaking, we should determine the targets at first before chasing them. In terms of data science, we usually have different folders for different projects to realize distinct targets. Therefore, one can view one project as a folder of codes for the specific target, such as all the assignments of some course and some analytical task. Here is the image to illustrate some example projects (tasks and usage) for data science.
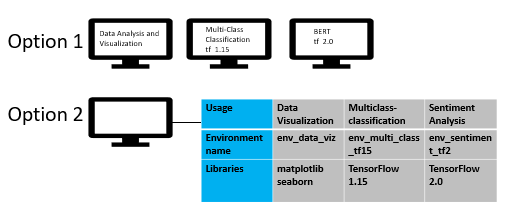
Source: https://miro.medium.com/max/1263/1*RJXS5hapodrGXvmIBhUEEw.png
In order to complete the projects, conceptually we need tools and in the context of data science we need Python or R, and the corresponding packages and libraries. The first question is that why we need to emphasize environments instead of directly installing Python or R. One tricky point is that when one use s specific app in the computer or mobile phone he or she usually has only one updated and stable version. That is, we usually do not have different versions of the same app under the same operation system. First, I wanna emphasize that we can always install Python and R into the global environment under the same operation system. Look,

Source: https://nbisweden.github.io/excelerate-scRNAseq/logos/conda_illustration.png
However, it is highly recommended to have separate environments for projects.
- First, compatibility issues are inevitable across different versions of Python or R. It is straightforward, exactly the same piece of code can work without errors under Python 2.x but may NOT work under Python 3.x.
- Secondly, compatibility issues also occur across different versions of packages and libraries. The syntax of functions of some specific package may be revised during the upgrades, so that the original codes may NOT work.
- Thirdly, complicated dependencies across packages and libraries also bring in the risks. With the above two reasons, the same codes may work some days ago but not now if one just have some upgrades, or they may work for your machine but not for those of your colleagues. Another threat rises from the dependencies. That is, usually one specific package or library usually depends on a bunch of other packages of specific versions. That is, if one updates some packages then the other package based on them may NOT work.
- Last but not least, the separate environment is beneficial to do it from the beginning again. Either the beginners or the experienced researchers usually encounter errors for the packages or libraries, and furthermore the interpreters. Sometimes, those errors are sort of difficult to debug. One solution that is always feasible is to do it from the beginning again. If we use specific environment for targeted project, then erasing that environment will NOT affects other environments and other projects.
Admittedly, the general projects for the students are mainly the class assignments, and reinstalling the Python and R may not bring in the high costs. However, why not learn more for project management in practice in the viewpoint of data science?
Managing Conda Environments (Python)
In this section, we talk about how to set up environments for Python. The first question is, what stuffs are supposed to be within a specific environment? Actually, at least we need the interpreter for either Python or R (or both). Furthermore, we need the packages and libraries of specific versions to enhance the functions for projects. The second question is, do we have smart management tools to manage environments? The answer is yes.
Anaconda provides their products for both individuals and enterprises data science toolkit. One can easily find the installation files of Anaconda Individual Edition here for difference OS. However, it is preferred to install the lightweight edition here, called Miniconda. All the commands covered in this post can work well for both, and I just use Miniconda as example. During the installation, it is highly suggested that to follow the defaults and please use the mouse to click install for me only to avoid that super user (sudo) is usually required in future usage.
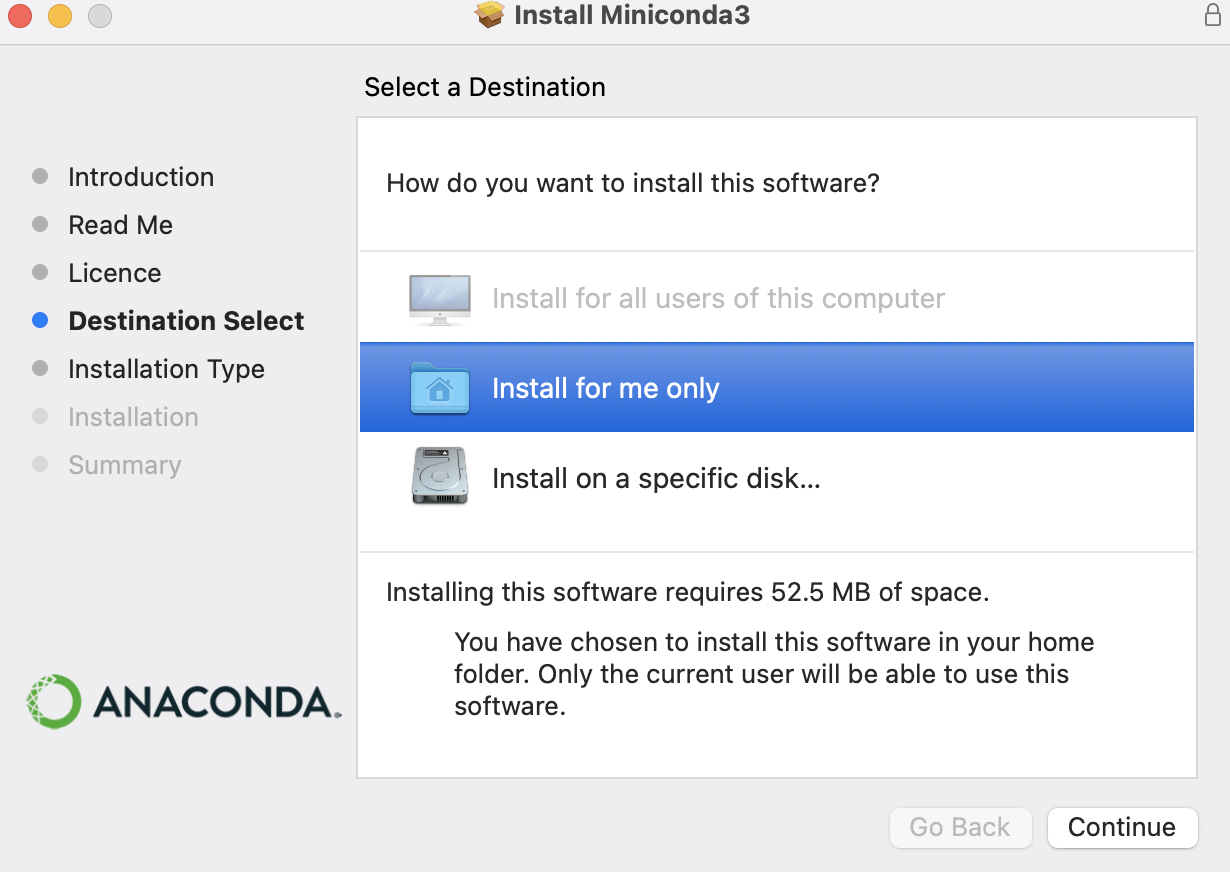
In Mac
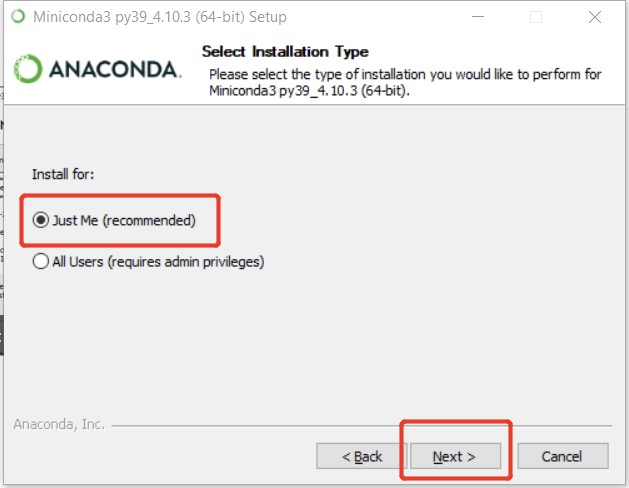
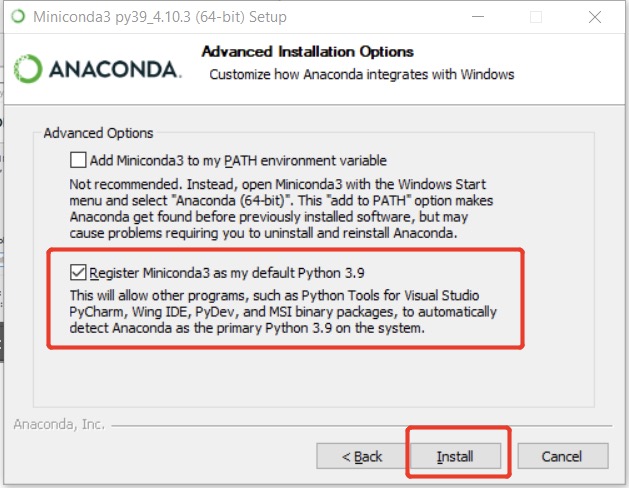
In Windows
After installation, please open the command line interface (CLI) in your system and start the tour with conda. In Mac, the default terminal emulator preinstalled in the system is Terminal app, which can be found in launchpad/Other/Terminal. Of course, other terminal emulators are also available for Mac, and one can check iTerm2 and Kitty for advanced exploration. In Windows, in order to facilitate the usage it is highly recommended to open Anaconda Prompt(Miniconda3) (if Miniconda is installed) or Anaconda Prompt(anaconda3) (if Anaconda is installed) in windows start menu. E.g.
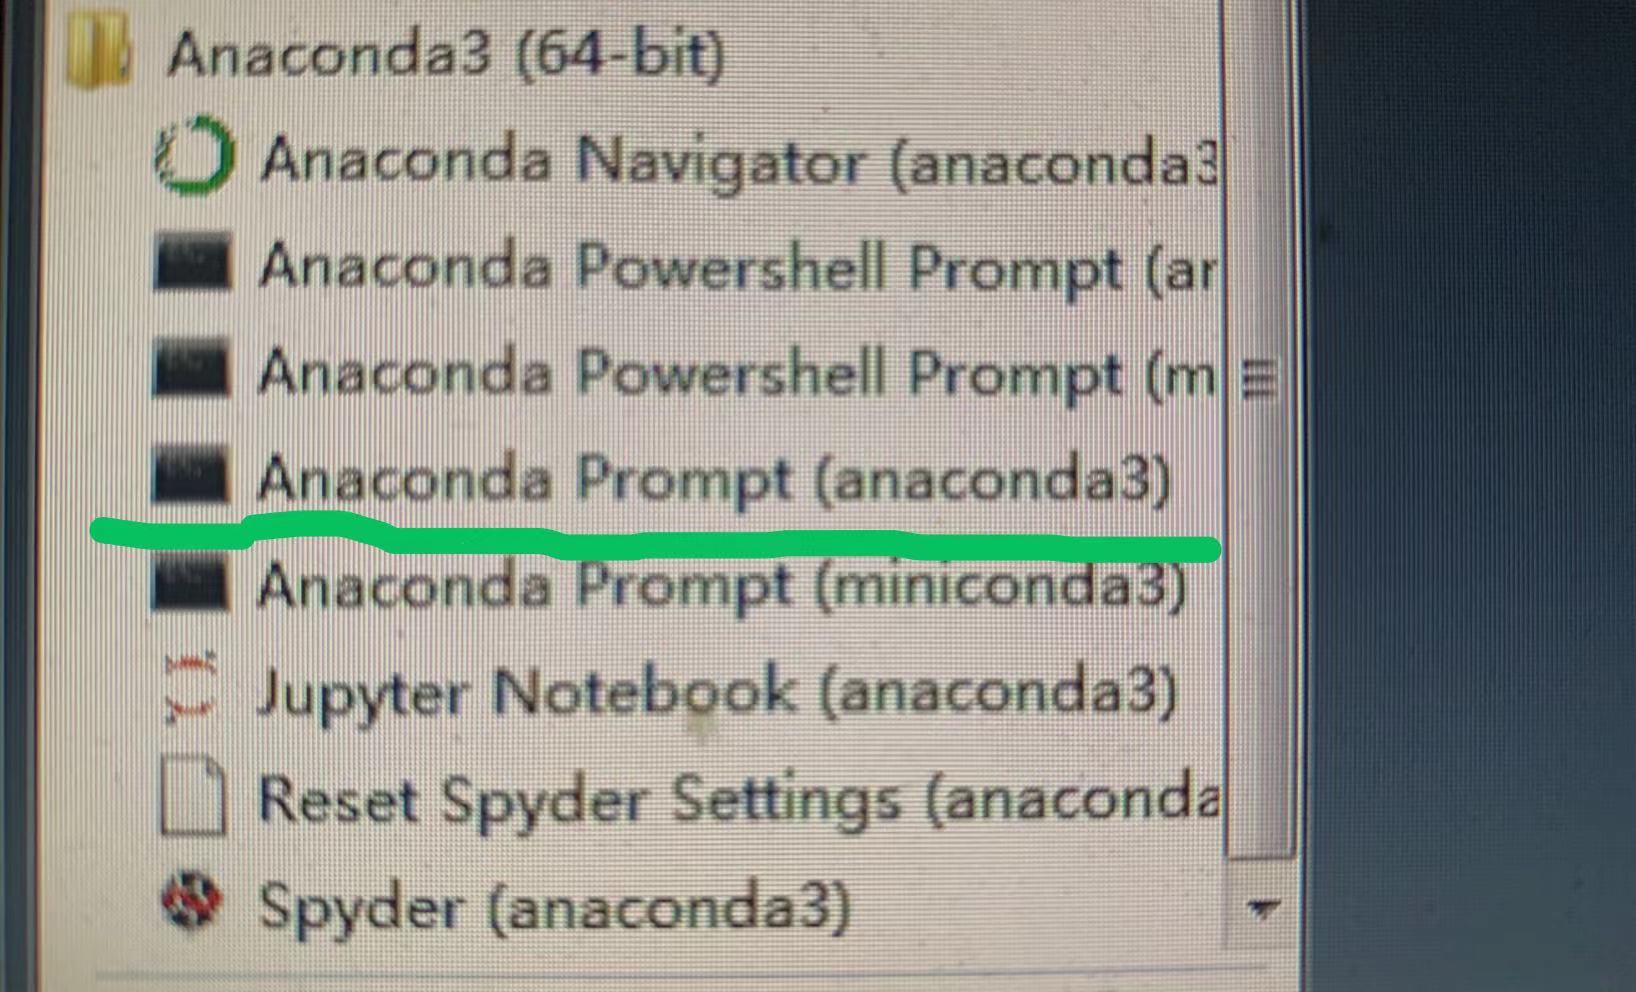
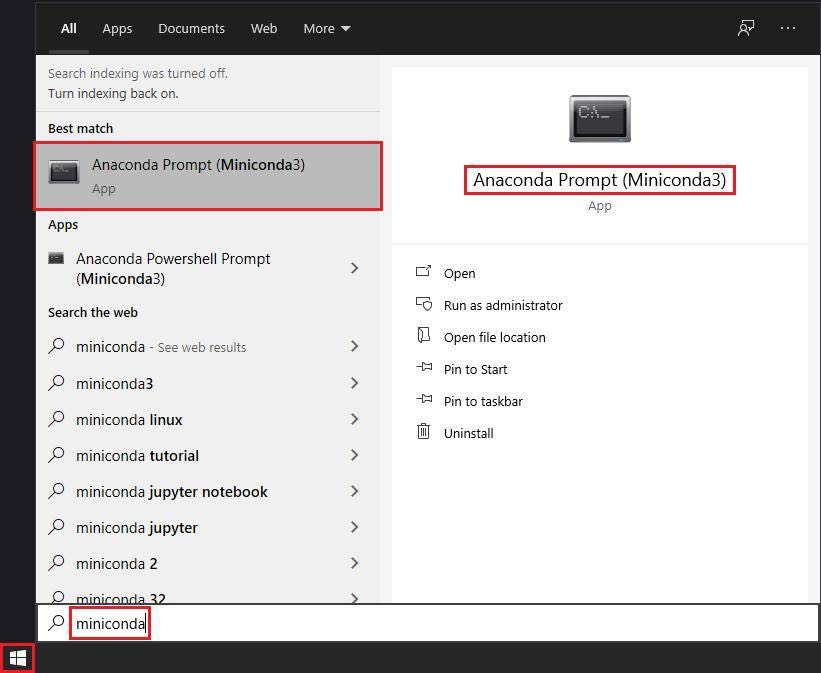
Or one may also use the search to find it:
First of all, please check that whether you conda environment is activated. Two ways can be tried. One is to observe whether (base) appear at the beginning of the command line. For example,
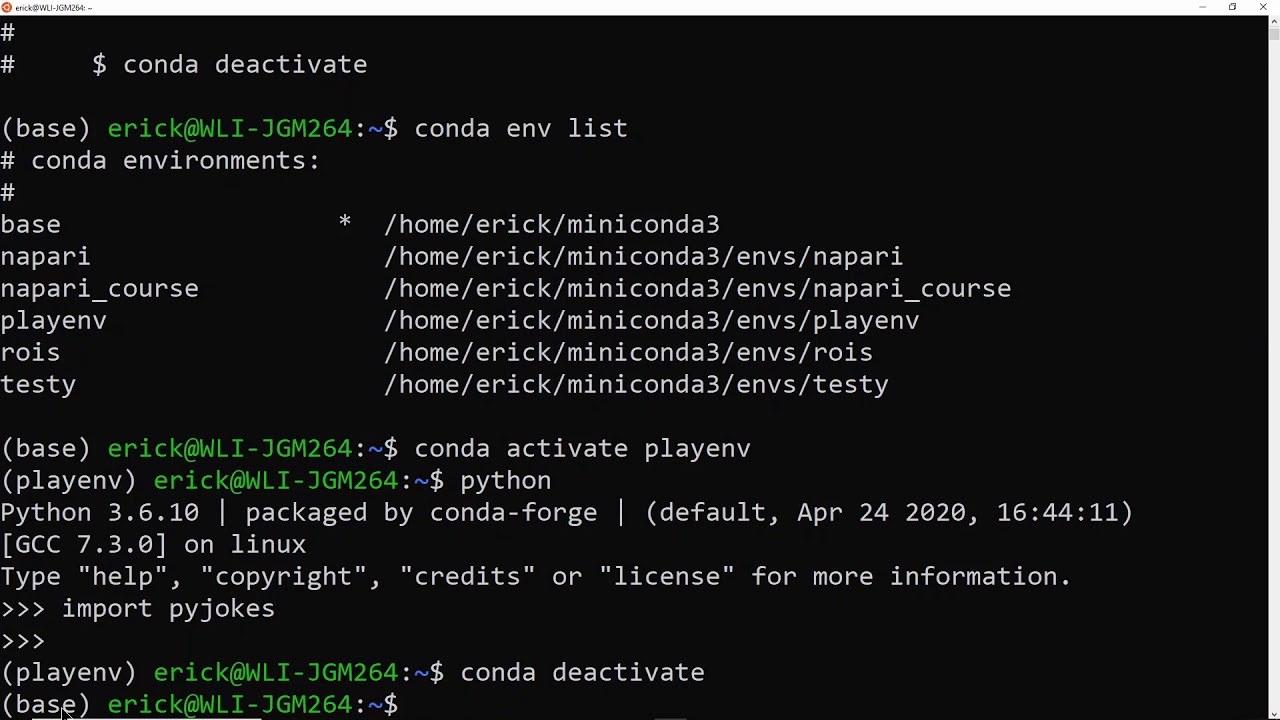
Source: https://www.youtube.com/watch?v=1VVCd0eSkYc
Source: https://stackoverflow.com/questions/52597174/do-i-need-to-activate-a-conda-environment-everytime-on-system-initialization
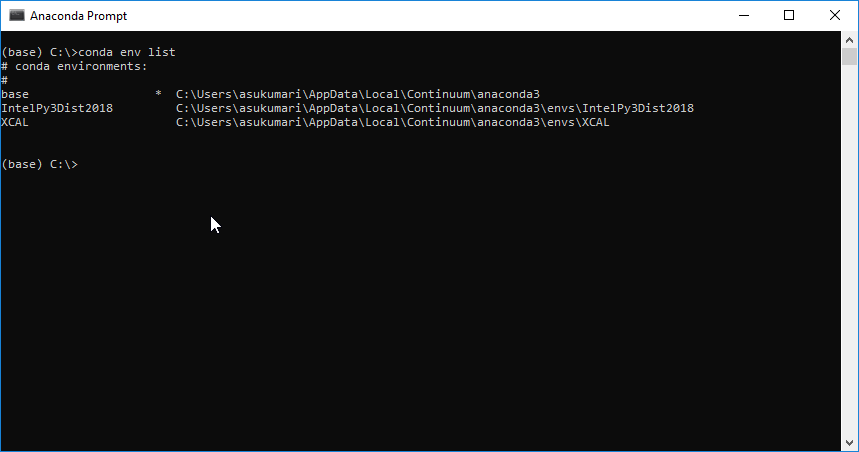
The second way is try inputting conda env list and check whether it works. If the information of Conda command not found shows, then conda environment is NOT activated. In general, with the Anaconda Prompt(Miniconda3) opened in Windows, conda environments should be automatically loaded. Otherwise, re-installation should solve it. On the other hand, conda environment is automatically activated in Terminal app if one just follows the defaults in the installation process. However, one may need to activate it by hand if this is NOT the case. Actually we can use the following command to activate the (base):
source /path-to-miniconda3/bin/activate
Please note that do not copy and paste the above command directly. Actually, one needs to check the location of Miniconda for your OS. Just take it for example, in my MacOS /path-to-miniconda3/ is ~/opt/miniconda3 , so the previous command becomes
source ~/opt/miniconda3/bin/activate
With this command, one should find (base) appear at the beginning of the command line, indicating that the (base) environment is activated. Now one should get the list of conda environments by inputting conda env list, and find that ONLY ONE (base) environment is listed.
Notes: Please keep in mind that one needs to activate the conda environment before applying various conda commands.
When (base) is activated then it means that one is applying the conda environment called (base), which is the default environment when the installation of Anaconda or Miniconda is complete. We can also check the packages and libraries within this environment by inputting conda list and the similar list is shown
#
# Name                    Version                   Build  Channel
brotlipy                  0.7.0           py39h9ed2024_1003
ca-certificates           2021.7.5             hecd8cb5_1
certifi                   2021.5.30        py39hecd8cb5_0
cffi                      1.14.6           py39h2125817_0
chardet                   4.0.0           py39hecd8cb5_1003
conda                     4.10.3           py39hecd8cb5_0
conda-package-handling    1.7.3            py39h9ed2024_1
cryptography              3.4.7            py39h2fd3fbb_0
idna                      2.10               pyhd3eb1b0_0
libcxx                    10.0.0                        1
libffi                    3.3                  hb1e8313_2
ncurses                   6.2                  h0a44026_1
openssl                   1.1.1k               h9ed2024_0
pip                       21.1.3           py39hecd8cb5_0
pycosat                   0.6.3            py39h9ed2024_0
pycparser                 2.20                       py_2
pyopenssl                 20.0.1             pyhd3eb1b0_1
pysocks                   1.7.1            py39hecd8cb5_0
python                    3.9.5                h88f2d9e_3
python.app                3                py39h9ed2024_0
readline                  8.1                  h9ed2024_0
requests                  2.25.1             pyhd3eb1b0_0
ruamel_yaml               0.15.100         py39h9ed2024_0
setuptools                52.0.0           py39hecd8cb5_0
six                       1.16.0             pyhd3eb1b0_0
sqlite                    3.36.0               hce871da_0
tk                        8.6.10               hb0a8c7a_0
tqdm                      4.61.2             pyhd3eb1b0_1
tzdata                    2021a                h52ac0ba_0
urllib3                   1.26.6             pyhd3eb1b0_1
wheel                     0.36.2             pyhd3eb1b0_0
xz                        5.2.5                h1de35cc_0
yaml                      0.2.5                haf1e3a3_0
zlib                      1.2.11               h1de35cc_3
Now we can raise the key difference between Anaconda and Miniconda. Anaconda will install the popular packages, such as numpy, into the (base), but Miniconda just install the basic packages into (base) instead. Generally speaking, if the concept of environments is ignored and always using (base) for any project is good to have popular packages installed in it. However, it is encouraged and recommended to set up separate environments for projects. With such target, it is beneficial to keep (base) as clean as possible and do NOT use it for projects. The reason is that one needs to reinstall the whole Anaconda or Miniconda if some fatal errors occur in (base) and then all environments need to be erased. If we indeed encounter the errors within some newly built environment, then the worst case is just to remove that environment without affecting other environments. Since it is preferred to NOT using (base) then it is not advantageous to have those popular packages installed in (base).
One can check the instruction file for managing environments using conda. Here I just raise some common commands for easy use. First, we need to know how to build a new environment. Since Anaconda is dedicated to Python originally, the new environment will install the Python interpreter by default. In addition, the exact version of Python can be predetermined:
conda create -n bridging_python python=3.8
This command will construct the environment called bridging_python with Python of version 3.8 installed. After the installation, one can check the list of conda environments by inputting conda env list. Now one should find two environments are included. Please note that (base) is still at the beginning of the command line, and you are still in the (base) environment. One can use the following command for such newly built environment:
conda activate bridging_python
Now you can find that bridging_python is at the beginning of the command line instead of (base), and now welcome to go to the new separate environment. The lucky point is that you can try anything within this environment, and you can always erase this environment by
conda remove --name bridging_python --all
Well, let’s check the packages already installed in this newly built environment by conda list. Actually you will find the list quite similar to the list in (base). Basically, the Python interpreter of version 3.8 is installed, and if you input python then the following interactive interpreter is shown:
Python 3.8.11 (default, Aug  6 2021, 08:56:27)
[Clang 10.0.0 ] :: Anaconda, Inc. on darwin
Type "help", "copyright", "credits" or "license" for more information.
>>>
Now you can try inputting some piece of Python codes and hit enter:
[1, 2, 3] * 3
and then you can see the instant results
[1, 2, 3, 1, 2, 3, 1, 2, 3]
Inputting exit() will quit the Python interaction back to the shell. As introduced before, packages are needed to provide powerful functions to compete the works in data science. The next step is to show how to install the packages within the conda environment. First, for most of the Python packages, usually we can use either of two options for package management. One is also conda with package channel of conder-forge, the other is pip. Fortunately within conda environment, both commands are available for package management. For example, if we are interested in numppy package, just google it and go to its webpage. One can find that we can use pip for installation:
pip install numpy
If one also google search for numpy conda forge then you may also find this webpage saying that we can also install it by
conda install -c conda-forge numpy
You can follow either way to install numpy but please do NOT use both ways for repeated installation. Of coz, we can still specify the version of numpy for installation, and you can just google the syntax using conda or pip. Please also keep in mind,
Notes: Before the manipulation of the packages, please check whether you are in the correct environment you want.
Now please check the list of packages by conda list:
# Name                    Version                   Build  Channel
ca-certificates           2021.5.30            h033912b_0    conda-forge
certifi                   2021.5.30        py38h50d1736_0    conda-forge
libblas                   3.9.0               10_openblas    conda-forge
libcblas                  3.9.0               10_openblas    conda-forge
libcxx                    10.0.0                        1
libffi                    3.3                  hb1e8313_2
libgfortran               5.0.0           9_3_0_h6c81a4c_23    conda-forge
libgfortran5              9.3.0               h6c81a4c_23    conda-forge
liblapack                 3.9.0               10_openblas    conda-forge
libopenblas               0.3.17          openmp_h3351f45_1    conda-forge
llvm-openmp               12.0.1               hda6cdc1_1    conda-forge
ncurses                   6.2                  h0a44026_1
numpy                     1.21.1           py38had91d27_0    conda-forge
openssl                   1.1.1k               h0d85af4_0    conda-forge
pip                       21.2.2           py38hecd8cb5_0
python                    3.8.11               h88f2d9e_1
python_abi                3.8                      2_cp38    conda-forge
readline                  8.1                  h9ed2024_0
setuptools                52.0.0           py38hecd8cb5_0
sqlite                    3.36.0               hce871da_0
tk                        8.6.10               hb0a8c7a_0
wheel                     0.36.2             pyhd3eb1b0_0
xz                        5.2.5                h1de35cc_0
zlib                      1.2.11               h1de35cc_3
One can find numpy and related dependencies are installed, and the conda-forge is shown to indicate the source channel for installation. One can also remove the package by conda remove numpy. However, if we install numpy through pip, what happens for the package information? Now I try removing numpy by
conda remove numpy
and then reinstall numpy using
pip install numpy
and check conda list:
# Name                    Version                   Build  Channel
ca-certificates           2021.7.5             hecd8cb5_1
certifi                   2021.5.30        py38hecd8cb5_0
libcxx                    10.0.0                        1
libffi                    3.3                  hb1e8313_2
ncurses                   6.2                  h0a44026_1
numpy                     1.21.1                   pypi_0    pypi
openssl                   1.1.1k               h9ed2024_0
pip                       21.2.2           py38hecd8cb5_0
python                    3.8.11               h88f2d9e_1
readline                  8.1                  h9ed2024_0
setuptools                52.0.0           py38hecd8cb5_0
sqlite                    3.36.0               hce871da_0
tk                        8.6.10               hb0a8c7a_0
wheel                     0.36.2             pyhd3eb1b0_0
xz                        5.2.5                h1de35cc_0
zlib                      1.2.11               h1de35cc_3
Now you find pypi shown for the information of channel. Now we have numpy installed, so we can re-enter the interactive Python (REPL stands for Read, Evaluate, Print, Loop) by inputting python and input the codes to test numpy:
Python 3.8.11 (default, Aug  6 2021, 08:56:27)
[Clang 10.0.0 ] :: Anaconda, Inc. on darwin
Type "help", "copyright", "credits" or "license" for more information.
>>> import numpy as np
>>> np.sum([1,2,3])
6
>>> quit()
From such example, one may find that it is so easy to install or remove the package within conda environment. Please just make sure that you are in the correct environment at first. Secondly, google the package you are interested in and then follow the instruction to use conda with conda-forge channel or pip to install it, but NOT both for repeated installation.
Up until now, we have known how to manage the environments and packages within some environment. With separate environments we can handle different projects. One can easily set up the version for the Python interpreter, as wells as the packages. It is strongly recommended to search for the information for the targeted package at first and get the basic information about the installation commands. Currently within some conda environment conda with conda-forge channel or pip are both supported for the installation of packages. However, replication and reproducibility are still not illustrated up until now. How can your colleagues try testing your codes and reproduce your results? Ideally, they need to have exact the same environment as yours. Is it any simple way to copy the environment? The answer is yes. Please note the results when inputting conda list, and one can find that actually this is just the table and data frame to record the information within the environment. Fortunately, conda provides the simple command to export the information for the environment. First, one needs to find the location to store the such file using the command line. We can use cd in Terminal app in MacOS and dir in Anaconda Prompt (Miniconda3) in Windows to change the working directory in the command line. Then, please make sure you are in the conda environment you wanna export, for example, bridging_python.
conda env export > bridging_python_env.yml
You can open such yml file using any editor and you can find similar contents:
name: bridging_python
channels:
  - defaults
dependencies:
  - ca-certificates=2021.7.5=hecd8cb5_1
  - certifi=2021.5.30=py38hecd8cb5_0
  - libcxx=10.0.0=1
  - libffi=3.3=hb1e8313_2
  - ncurses=6.2=h0a44026_1
  - openssl=1.1.1k=h9ed2024_0
  - pip=21.2.2=py38hecd8cb5_0
  - python=3.8.11=h88f2d9e_1
  - readline=8.1=h9ed2024_0
  - setuptools=52.0.0=py38hecd8cb5_0
  - sqlite=3.36.0=hce871da_0
  - tk=8.6.10=hb0a8c7a_0
  - wheel=0.36.2=pyhd3eb1b0_0
  - xz=5.2.5=h1de35cc_0
  - zlib=1.2.11=h1de35cc_3
  - pip:
    - numpy==1.21.1
prefix: /Users/alfredfaisam/opt/miniconda3/envs/bridging_python
In your computer of your colleagues with Anaconda or Miniconda installed, they can create the environment called bridging_python from such yml file by
conda env create -f bridging_python_env.yml
One only needs to be careful the file name and the path are correct. Therefore, one can easily examine your codes using exactly the same environment to facilitate cooperation.
Python Scientific Libraries for Data Science
In terms of data science, several packages are quite popular to process the data.
- numpy: The fundamental package for scientific computing, and especially for high dimensional arrays (e.g. vector, matrix, etc.).
- pandas: a fast, powerful, flexible and easy to use open source data analysis and manipulation tool.
- statsmodels: provides classes and functions for the estimation of many different statistical models, as well as for conducting statistical tests, and statistical data exploration.
- seaborn: data visualization library based on matplotlib. It provides a high-level interface for drawing attractive and informative statistical graphics.
During this crash course, we are going to cover the basic syntax for base Python and some examples from these packages. One can use the following command to install all (please make sure that you are in the bridging_python environment at first):
pip install pandas statsmodels seaborn
Jupyter Lab
Now we have set up the Python environment called bridging_python for Python interpreter and related packages. Strictly speaking, we can use such environment for works. Previously we have met the example to go to interactive Python by inputting python in the command line:
❯ python
Python 3.8.11 (default, Aug  6 2021, 08:56:27)
[Clang 10.0.0 ] :: Anaconda, Inc. on darwin
Type "help", "copyright", "credits" or "license" for more information.
>>>
However, we have a better way for Python programming. One can check Jupyter lab, which is also the package to install using either of
onda install -c conda-forge 'jupyterlab>=3.0.0,<4.0.0a0'
or
pip install 'jupyterlab>=3.0.0,<4.0.0a0'
but NOT both.
Warning: Windows users need to use double quotes instead of single quote for the strings. Otherwise, the Anaconda Prompt (Miniconda3) will return errors.
Here we just restrict its version below 4.0. The main reason is to avoid its compatibility issues with other packages or plugins. One can also check the video for the basic usage of Jupyter lab. Actually, Jupyter lab is the integrated development environment (IDE) for development, and one can view it as the tool for easy coding. One can find the example .ipynb files used in this course, which are opened and edited using Jupyter lab. After the installation, one can input jupyter lab, and then a new tab will be activated in your browser (chrome based browser is highly recommended). Now we can play with it.
On the other hand, one can also check the useful plugins to enhance Jupyter lab. Please note
Warning: Shut down the jupyter lab before installing any packages or plugins. After the installation to complete, then re-enter jupyter lab.
- jupyterlab-lsp: Coding assistance for JupyterLab (code navigation + hover suggestions + linters + autocompletion + rename) using Language Server Protocol. One can follow the steps in their homepage for installation and the key steps are demystified here:
First install the lsp plugin:
pip install jupyterlab-lsp
and then install the lsp supporting package for Python
pip install 'python-lsp-server[all]' python-lsp-black mypy-ls pyls-isort
- Jupyterlab Code Formatter: This is a small Jupyterlab plugin to support using various code formatter on the server side and format code cells/files in Jupyterlab.
First install the plugin:
pip install jupyterlab_code_formatter
Then install a series of supported code Pyton formatters:
pip install black isort autopep8 yapf
Managing Conda Environments (R)
In this section, conda environment for R is introduced. Generally speaking, we can also use conda to build a new environment for R. Here we can begins from the yml file here:
name: bridging_python_r
channels:
  - conda-forge
  - defaults
dependencies:
  - python=3.8
  - conda-forge::r-essentials=4.1.0
  - conda-forge::libblas=3.9.0=9_mkl
One can find that the built environment is called bridging_python_r. One can also I put python in the name. The reason is that conda environment installs Python interpreter by default, so I also specify its version as 3.8. One can also see that I request to install r-essentials=4.1.0 for R interpreter and also the popular R packages, such as tidyverse, are also installed into this environment. On the other hand, I also specify mkl as the low level engine for matrix computation, which is much faster than the default ones: Improving R Perfomance by installing optimized BLAS/LAPACK libraries. Now put this bridging_python_r_env.yml file in the directory you like, and then use your cmd.exe in windows or Terminal.app in MacOS to navigate into that directory. Input the following to build the new environment:
conda env create -f bridging_python_r_env.yml
Waiting for the installation to complete, one can check by conda env list to find the new environment called bridging_python_r. Now use conda activate bridging_python_r to go to the newly built environment. If we input R in the command line, one can go to the R console:
R version 4.1.0 (2021-05-18) -- "Camp Pontanezen"
Copyright (C) 2021 The R Foundation for Statistical Computing
Platform: x86_64-apple-darwin13.4.0 (64-bit)

R is free software and comes with ABSOLUTELY NO WARRANTY.
You are welcome to redistribute it under certain conditions.
Type 'license()' or 'licence()' for distribution details.

  Natural language support but running in an English locale

R is a collaborative project with many contributors.
Type 'contributors()' for more information and
'citation()' on how to cite R or R packages in publications.

Type 'demo()' for some demos, 'help()' for on-line help, or
'help.start()' for an HTML browser interface to help.
Type 'q()' to quit R.

>
Input q() and then we can quit to the command line.
R Packages Management
Similar discussion about R package management is raised here. In general, we have two options to do so. One is to keep on using conda. The R language packages are available to install with conda at http://repo.anaconda.com/pkgs/r/. You can install any of these R language packages into your current environment with the conda command conda install -c conda-forge rpackagename. One can also refer to the file here. For example, one can install rpy2, which is Python interface to the R language (embedded R), and r-languageserver, which is the lsp supporting package for R.
conda install -c conda-forge rpy2 r-languageserver
Similarly, we can also remove the packages using
conda remove rpackagename
Another way is to use R built-in manager. When going into R console, one can use
install.packages("AER")
to install the package AER
Of coz, one can also remove it within R console:
remove.packages("AER")
On the other hand, one can quit R back to the command line, and then use conda to reinstall it:
conda install -c conda-forge r-aer
What are the differences between these two methods? In terms of application, no obvious differences for both methods. However, one may find that some R packages may not have the conda ones. That is, one needs to find the appropriate instructions for such R package installation. Two merits for the installation using conda. One is that the conda R packages are usually compiled for installation, which means the installation process should be fast without compilation. Another is that one can always generate the yml file to include the information of all R packages installed using conda for some environment to share with your colleagues. However, if one uses the R built-in package management for some packages, the information of those packages will be NOT shown in the yml file.
Jupyter Lab Again
For programming using R, one can also use Jupyter lab as the IDE. One only needs to repeat previous steps to install Jupyter lab in this environment. This is the separate environment from bridging_python we used before.
pip install 'jupyterlab>=3.0.0,<4.0.0a0'
Then we can also install the lsp plugin:
pip install jupyterlab-lsp
and then install the lsp supporting package for Python
pip install 'python-lsp-server[all]' python-lsp-black mypy-ls pyls-isort
Please note that we have installed R lsp package, which is languageserver. Next we can also install Jupyterlab Code Formatter for this environment.
First install the plugin:
pip install jupyterlab_code_formatter
Then install a series of supported code Pyton formatters:
pip install black isort autopep8 yapf
Please note that we have installed R lsp package (languageserver) and rpy2 to support this plugin to work for R. Now if we input jupyter lab under this environment, then we can find that we can build the new notebook using R or Python as the kernel. Please also note that Python kernel here is just the Python interpreter in bridging_python_r but NOT that in bridging_python.
Rstudio
Actually, for programming in R we have another common option IDE, called Rstudio. One can easily download and install it in their website. The tricky point is that when one firstly opens it in Mac, the following error may occur:
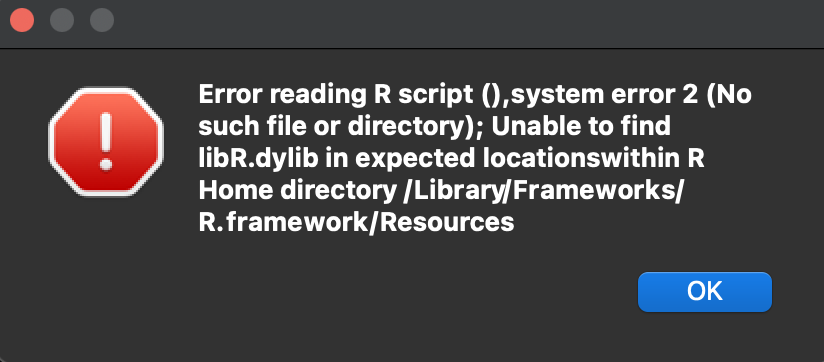
The reason is that Rstudio cannot find the R path in the usual locations. Actually, one can install R in the global environment by downloading and installing it from the R home page. Doing so can makes Rstudio automatically find the path for the global R. However, currently we have R installed in the conda environment, so what can we do can make Rstudio find the location of R. Just in the Terminal app to activate the conda envionment with R installed in it, bridging_python_r in our case. Next we input
open -na rstudio
Then the Rstudio can be opened for use. Please note that now Rstudio is using R within the specified environment.
Warning: If one wanna install the R packages using conda. Please shut down the Rstudio at first, just like you shut down Jupyter lab before the installation of the packages before.
However, if one determines using the R built-in package management, then just do it in Rstudio. One can also check the crash course to use Rstudio.
For Windows users, after installation of Rstudio one needs to configure the environment variables for it since Windows does NOT automatically handle it automatically. Follow the following to add the path for Rstudio and just make sure that the path is correct for your own installation.
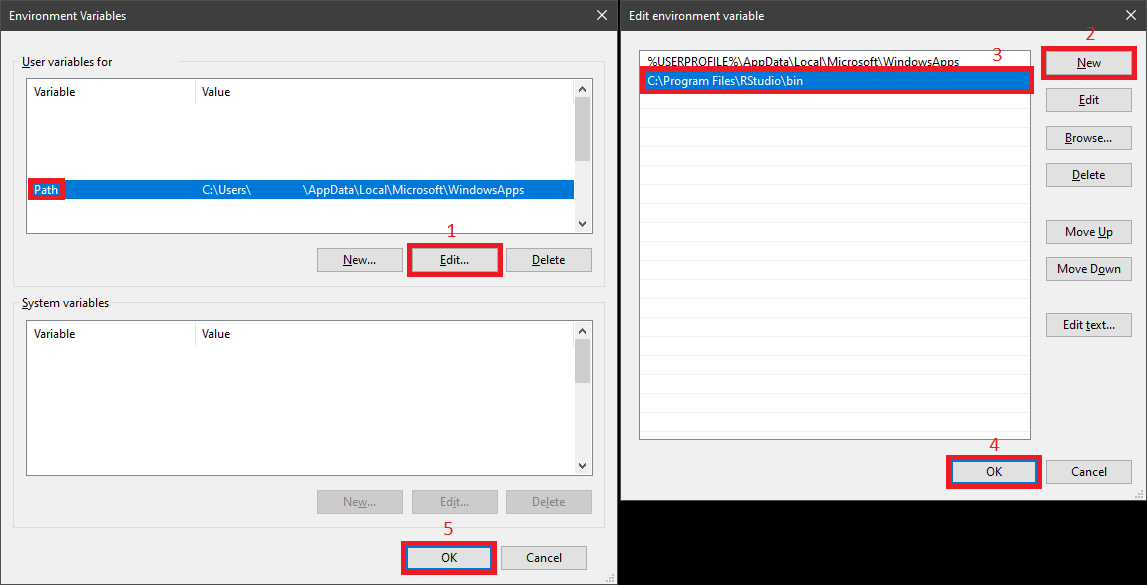
With such setups, Anaconda Prompt (Miniconda3) should recognize Rstudio. Therefore, please activate the dedicated conda envionment with R installed in it, bridging_python_r in our case. Next we input the following to let Rstudio load the corresponding conda environment:
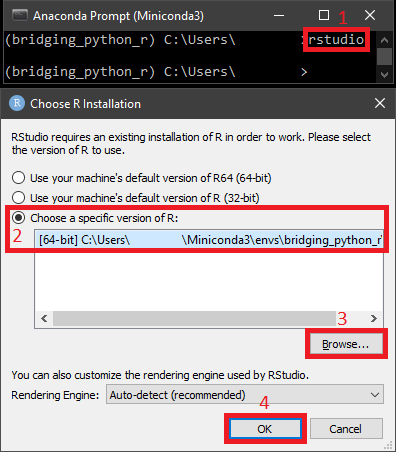
One more thing that may still confuse the Windows users is the accurate path of R binary from the conda environment. The usual full path should be like C:\Users\<username>\Miniconda3\envs\bridging_python_r\lib\R\bin\x64\R, and one can refer to it within your own directory.
Summary
During this post, the steps to use conda to manage Python and R environments are introduced. One can mimic the whole steps and go through the related materials and videos to have basic experience. Next, we will practice basic codes of Python and R for data procession.
References
-
For the materials of Python programming, please check Python Programming for Economics and Finance
-
For the materials of data processing using Pandas, please check Chapter 2 - 4 in Hands-On Data Analysis with Pandas – Second Edition
-
For the materials for R preview, please check Part 1 and Part 2 in Practical Data Science